
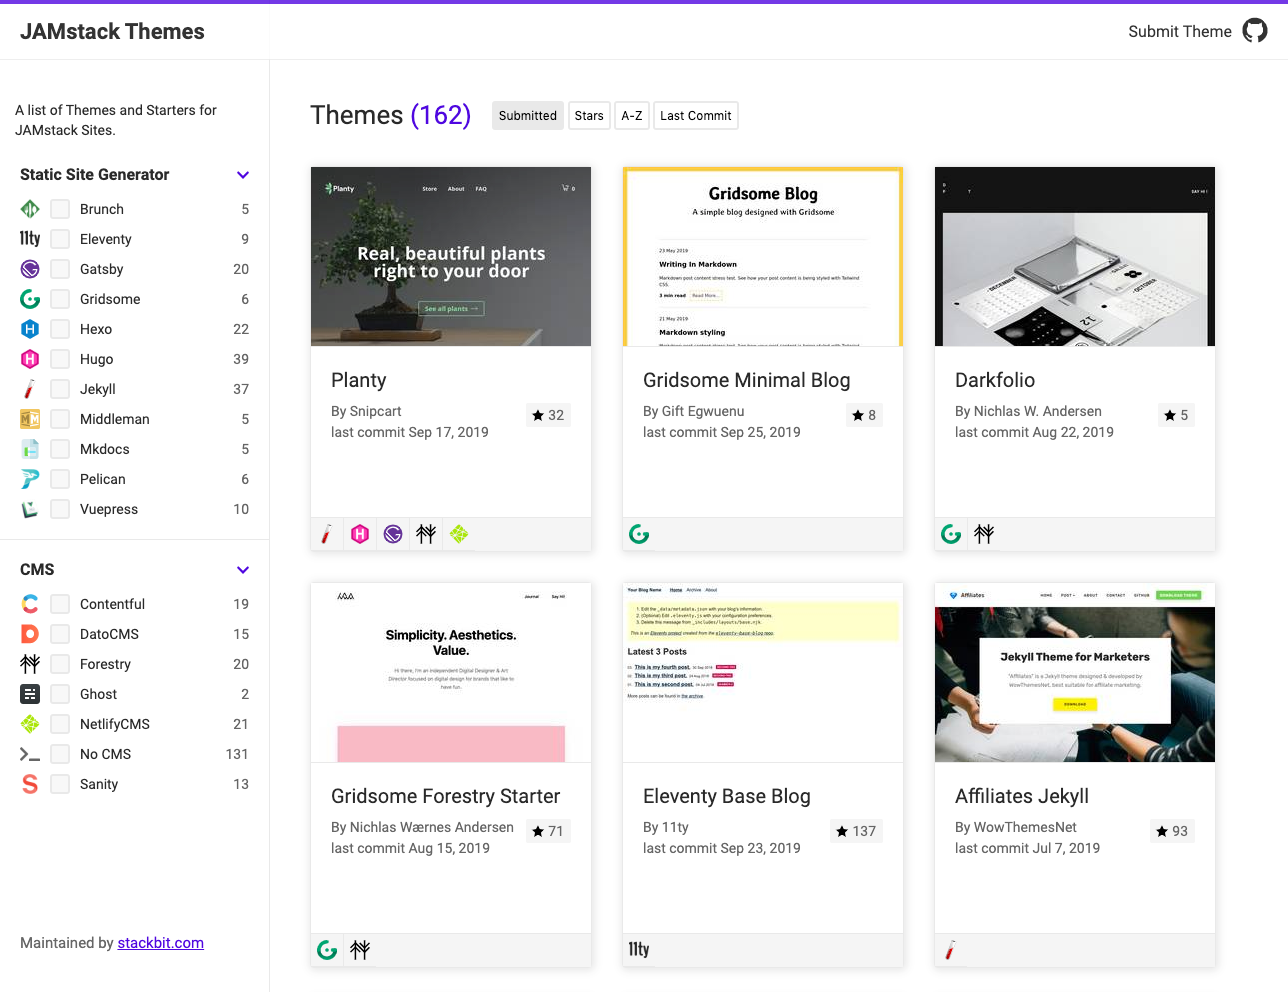
Stackbit recently launched JAMstack Themes. It’s a free resource that lists hundreds of themes and starters for JAMstack sites. This post is a retrospective on how I built the site.
The Idea
At Stackbit I do a lot of work on Uniform Themes. It lets developers turn existing themes built with any Static Site Generator (SSG) into CMS-powered websites that deploy to Netlify. Here’s an example using an open source Hugo Theme: https://app.stackbit.com/create?theme=https://github.com/JugglerX/hugo-serif-theme
I develop themes for nearly all the different static site generators. There are hundreds of themes out there and I was surprised there was no resource that collected all of them in one place. So I decided to create one 🤔 and as it turns out it didn’t take long. It’s a great example of how rapid and low friction the JAMstack can make building websites. Literally, the first thing I showed the team at Stackbit was a link to a working website at our Monday morning standup.
Choosing the SSG
When I choose an SSG I consider the following:
- the site archetype
- the data sources
- key functionality / interactive features
Gallery Archetype & Categories
I knew JAMstack Themes was going to be a gallery archetype, reminiscent of the old CSS Gallery sites. I also wanted to knock out a working prototype in just a few days. This meant I needed robust taxonomy (category) support and If possible I’d like first class categorisation and tagging to ship configured with the SSG.
Theme Submissions
I would need to handle theme submissions. The expected way to handle user submissions is with a webform and a database with some kind of publishing approval step in a CMS. The scope can quickly escalate; adding authentication, roles, user pages which show the approval status etc. I didn’t want to ruin my weekend, I wanted a workable solution that skipped all of these steps.
In the JAMstack ecosystem I’ve seen an increasing normalisation of using GitHub directly for content publishing. It’s a process that really shines when markdown is used as the data source. Obviously the main downside is it requires a person to have knowledge of Git to contribute. Luckily for me, contributors are mostly theme developers. A really interesting feature for the future would be to allow theme submissions using a Netlify form and a serverless function.
Content Types
The site would only have one custom content type, “theme” and the data source should be markdown files so that a public Git submission workflow was as simple as possible.
Interactive Filtering
Finally the only complex interactive feature would be filtering the themes. I knew masonry.js and isotope.js could achieve this with ease but they are both libraries which manipulate the DOM directly. A React component might be a superior choice but was it worth moving to Gatsby? Gatsby would set me back at least a few days, I would need to build the categories, relationships and views from scratch. I’d need to write GraphQL queries for markdown… I’d need to install and configure a dozen plugins just to get basics SEO, SVG, SCSS, etc.
Selecting Hugo
Having identified the requirements and considering my timeline I decided to go with Hugo. One of Hugo's strengths (and weaknesses) is its prescriptive content and template structure. With Hugo, the folder and naming conventions of your content inform the template lookup order and selection. Other SSG’s are typically less opinionated about this or rely more heavily on a template lookup key (explicitly declaring which template to use in the front-matter). I had a clear content type which required list and detail views and I would get all of this for free in Hugo if I just placed the content in content/theme/theme-name.md. Hugo also has first class taxonomy support out of the box and it would automatically generate views for each taxonomy and term. Great for a gallery site. Finally Hugo works with zero dependencies. It comes with SCSS and asset minification included (Sorry no CSS in JS 😂). This would help me move fast. It also has a few bonus features I was keen to leverage: Git file info and JSON/RSS output formats.
I could delve into the pros and cons of Hugo vs the other SSG’s but thats its own article. Needless to say all the top SSG’s could have done the job. Hugo was a good fit for this project and it’s an SSG I felt I could work with quickly without getting “bogged down in the tech”
Starting Development
I looked around at a couple of gallery sites for inspiration and concluded that I didn’t need to reinvent the wheel design-wise. So I skipped Sketch and started designing straight in the browser.
The first thing I did was install Hugo, create a basic skeleton theme and get my assets (JS & SCSS) files included in the layouts/_default/baseof.html. Hugo comes with default list and single views that were adequate enough to render the pages. So a quick hugo server got me a running localhost. Hugo also compiles SCSS and minifies JS out of the box so I didn’t need to worry about any additional pre-processing tooling.
Then I focused on content. I defined the main content type of “theme” in content/theme/alembic.md
---title: 'Alembic'github: https://github.com/daviddarnes/alembicdemo: https://alembic.darn.es/author: David Darnesssg:- Jekyllcms:- NetlifyCMS- Forestry- DatoCMS- Contentful---
The front-matter outlines the available fields for use in the templates. github and demo provide the links to the theme itself. ssg and cms are arrays of category items. These categories can be filtered on the homepage grid. My expectation is there will be hundreds of themes to choose from and and that filtering the themes down to a smaller subset will be a popular use case.
That’s pretty much it for our “database”—simple and effective 🥃. Hugo will handle the category relationships and create views for each. We just need to define them in the config.toml
[taxonomies] ssg = "ssg" cms = "cms"
Next I hunted around the internet and added about 20 themes. Getting real content into a browser as fast as possible always helps.
Creating the Homepage
The homepage is a grid of themes. The grid is a forEach loop (in Hugo a range) with a partial for the theme card. The grid is styled using flex-box.
{% raw %}{{ $themes := (where .Site.RegularPages "Type" "theme") }}{% endraw %}<div class="grids">    {% raw %}{{ range sort $themes "Lastmod" "desc" }}{% endraw %}    {% raw %}{{ partial "theme-card.html" . }}{% endraw %}{% raw %}{{ end }</div>
{% endraw %}
One cool (and relatively unknown) feature in Hugo is the Git file integration. In the range above I’m sorting the content by “Lastmod” which is normally a param in the markdown files front-matter, ie lastmod: "2006-01-02" but if you set the following in your config.toml enableGitInfo: true Hugo will automatically use the Git commit dates of each file as the last modified date. This was perfect for a gallery site, where typically the default sort order is submission date. This means returning visitors and people consuming JSON or RSS feeds receive new themes first.
Generating GitHub Data
Now that I had a grid of themes I realised I needed a little more metadata to help me evaluate the themes quality. I wanted to see the repos star count and last commit date. This is a useful proxy to assess quality and staleness of a theme without having to click through to the actual GitHub repo. It also allowed for additional sorting options.
Since stars and last commit are constantly changing, it wasn’t information that could be submitted in the markdown files front-matter. I needed to use the GitHub API to get this data. I would fetch this data every time the site was built, which wouldn’t be real time, but it would be good enough for the MVP. I figured I could add scheduled builds in the future.
Unfortunately API calls to get JSON are not possible in Hugo. This is where an SSG like Gatsby or Gridsome starts to differentiate itself. In these SSG’s you can perform an API call using Fetch or Axios as part of the build process. A colleague also pointed out this [feature in 11ty](https://www.11ty.io/docs/quicktips/eliminate-js/) 🔥 which really nails this use case. To make it work with Hugo you need to write additional build scripts (using node, grunt, gulp etc) and then override the default build command. It’s not wrong, but I always feel like I have reached the natural limits of the SSG when I can’t run the default build command.
I wrote the following node script generate-github.json. It reads the markdown files from content/theme and does an API call for each GitHub repo in the markdown files front-matter.
const fs = require('fs'); const path = require('path'); const yamlFront = require('yaml-front-matter'); const gh = require('parse-github-url'); const axios = require('axios'); const themesFolder = './content/theme'; const themeFiles = fs.readdirSync(themesFolder); const githubData = {}; const token = process.env.GITHUB_TOKEN; loadTheme = async file => { const data = fs.readFileSync(path.join(themesFolder, file)); const frontmatter = yamlFront.loadFront(data); if (frontmatter.github) { let github = gh(frontmatter.github); let githubBranch = frontmatter.github_branch ? frontmatter.github_branch : 'master'; let themeKey = github.repo.replace("/", "-").toLowerCase(); if (githubBranch !== 'master') { themeKey = `${themeKey}-${githubBranch}` } repoResponse = await axios.get( `https://api.github.com/repos/${github.repo}`, { headers: { Authorization: `Token ${token}`, }, } ).then((res) => { console.log(`${file} => ${res.data.html_url} - ${res.status}`); repoResponse = res; githubData[themeKey] = { theme_key: themeKey, name: repoResponse.data.name, repo: repoResponse.data.full_name, branch: githubBranch, url: repoResponse.data.html_url, stars: repoResponse.data.stargazers_count, forks: repoResponse.data.forks_count, open_issues: repoResponse.data.open_issues_count, last_commit: repoResponse.data.pushed_at } }); } }; Promise.all(themeFiles.map(file => loadTheme(file))) .then(res => { console.log("Writing data/themes.json...") fs.writeFileSync('./data/themes.json', JSON.stringify(githubData, null, 2)); }) .catch(error => { console.log(error); });
This writes a JSON file to data/themes.json, which includes all the GitHub meta data for each theme. Themes are keyed objects. So in the Hugo template I can easily lookup the data from different layouts.
{% raw %}
{% raw %}{{ $repoName := (substr (replace .Params.github "/" "-") 19 | urlize) }}{% endraw %}{% raw %}{{ $repo := index .Site.Data.themes $repoName }}{% endraw %}{% raw %}{{ $repo }}{% endraw %}
{% endraw %}
For example, given the following markdown file...
---title: 'Alembic'github: https://github.com/daviddarnes/alembic...---
...and the following content/themes.json
[ ... "daviddarnes-alembic": { "theme_key": "daviddarnes-alembic", "name": "alembic", "repo": "daviddarnes/alembic", "branch": "master", "url": "https://github.com/daviddarnes/alembic", "stars": 331, "forks": 367, "open_issues": 3, "last_commit": "2019-07-09T07:57:57Z" }, ...]
`{% raw %}{% raw %}{{ $repoName }}{% endraw %}{% endraw %}` would output daviddarnes-alembic. We can use this to lookup the object in data/themes.json using {% raw %}{% raw %}{{ $repo := index .Site.Data.themes $repoName }}{% endraw %}{% endraw %}
In our template we can then render this data
{% raw %}
{% raw %}{{ $repo.stars }}{% endraw %}
{% endraw %}
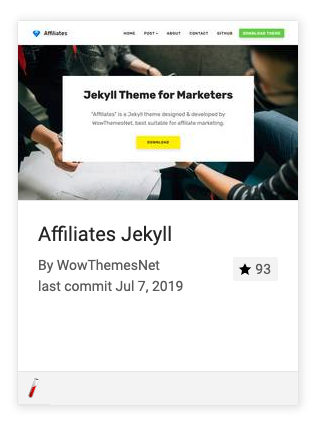
Generating Images
Initially I intended for people to take the screenshots of their themes and submit them with the PR, but this created some scaling issues. And, honestly, I quickly got bored of taking screenshots manually when I did the first few themes myself 😴
It turns out automating the screenshots was a great decision. It allowed me to quickly change image dimensions and quality settings in bulk as I iterated on the sites design. It also ended up making the submission process even easier. Users no longer need to submit an image and every theme was on an even playing field the thumbnail would be an image of the actual demo URL.
I wrote a node script to capture hi-res screenshots. The script iterates through all the markdown files in content/themes and extracts the value from the front-matter demo field. It then uses Pageres to visit the site using a headless browser and capture a screenshot.
const Pageres = require('pageres'); const fs = require('fs'); const path = require('path'); const yamlFront = require('yaml-front-matter'); const gh = require('parse-github-url'); const themesFolder = './content/theme'; const themeFiles = fs.readdirSync(themesFolder); const hiresImagesFolder = './static/capture'; captureWebScreenshot = async theme => { const data = fs.readFileSync(path.join(themesFolder, theme)); const frontmatter = yamlFront.loadFront(data); let github = gh(frontmatter.github); let githubBranch = frontmatter.github_branch ? frontmatter.github_branch : 'master'; if (github) { let themeKey = github.repo.replace("/", "-").toLowerCase(); if (githubBranch !== 'master') { themeKey = `${themeKey}-${githubBranch}` } let themeImage = `${themeKey}.png` const url = frontmatter.demo if (fs.existsSync(path.join(hiresImagesFolder, themeImage))) { console.log(`${theme} skipped`) return false } else { console.log(`${theme} capturing`); const page = await new Pageres({delay: 2, filename: themeKey}) .src(url, ['1024x768'], {crop: true}) .dest(hiresImagesFolder) .run(); return page } } return false; }; Promise.all(themeFiles.map(theme => { captureWebScreenshot(theme) })).then(res => { }).catch(error => { console.log(error.message); });
...and a node script to convert the hi-res images into thumbnails of various sizes.
const fs = require('fs');const im = require('imagemagick');const path = require('path');const sharp = require('sharp')const hiresImagesFolder = path.join(__dirname, 'static/capture');const outputFolder = path.join(__dirname, 'static/images/theme/thumbnail')const outputFolder2x = path.join(__dirname, 'static/images/theme/thumbnail/2x')const imageFiles = fs.readdirSync(hiresImagesFolder);imageFiles.forEach((image) => { const inputImage = path.join(hiresImagesFolder, image) const imageName = path.parse(image).name const imageExtension = path.parse(image).ext const outputImage = path.join(outputFolder, `${imageName}.jpg`) const outputImage2x = path.join(outputFolder2x, `${imageName}-2x.jpg`) if (fs.existsSync(outputImage)) { console.log(`skipped ${inputImage}`) return false } else { console.log(`processing ${inputImage}`) sharp(inputImage) .resize({ width: 280, height: 180, fit: 'cover', position: 'top', }) .jpeg({ quality: 70, }) .toFile(outputImage) .then( (ImageResult) => { console.log(ImageResult); }).catch((err) => { console.log(err); }) sharp(inputImage) .resize({ width: 560, height: 360, fit: 'cover', position: 'top', }) .jpeg({ quality: 70, }) .toFile(outputImage2x) .then( (ImageResult) => { console.log(ImageResult); }).catch((err) => { console.log(inputImage) console.log(err); }) }});
Two thumbnails are generated for each theme. In the Hugo layouts I used srcset to serve the 2x images on higher density devices (macs?).
{% raw %}
<img width="280" height="180" loading="lazy" src="{% raw %}{{ $filePath | relURL }}{% endraw %}" alt="{% raw %}{{ .theme.Params.title }}{% endraw %} screenshot" srcset="{% raw %}{{ $filePathHiRes | relURL }}{% endraw %} 2x" />
{% endraw %}
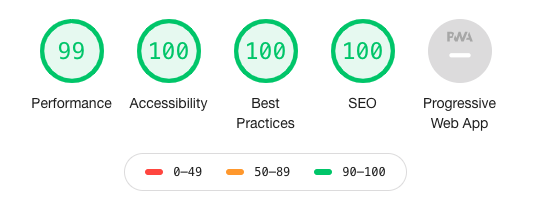
Normally I don’t bother doing this, but there are over 160 images on the homepage. Using srcset and careful image preparation I was able to maintain fast page loads with just native browser features.
I'm actually curious to see how many images/themes we can support until page speed suffers. I actually implemented the new chrome 76 native lazy loading but it's a bit hard to tell if it's working 😬. I feel like a lot of the JS techniques such as lazy loading, progressive scanning, etc. are good in theory but as a user they often feel janky and there is definitely a perceived slowness when scrolling.
The script also skips capturing and generating thumbnails for themes which already exist. This keeps the build times in Netlify super lean. In the future I will add an option to the scripts to regenerate all or just regenerate a target theme.
Build Pipeline
Now we have three scripts which need to be run before executing hugo build. One script which generates the additional themes metadata from the GitHub API and two scripts which capture the screenshots and generate the thumbnails.
Running these scripts manually was fine when it was just me working locally. But once the site was launched and people began to submit PR’s, it became clear these scripts would need to be run by Netlify as part of the build.
This is straightforward. First let’s wrap these scripts into a single familiar command npm run build. In the package.json create a new script
"scripts": {"build": "node ./generate-github.js && node ./capture-screenshots.js && node ./generate-thumbnails.js && hugo"}
Create a netlify.toml file and override the default hugo build command.
[build] publish = "public" command = "npm run build"[build.environment] HUGO_VERSION = "0.57.2"
Netlify Deploy Previews for PR’s
One of my favourite Netlify features is deploy previews. When a GitHub PR is submitted, Netlify automatically creates a deploy preview 🏜 I don’t know where it comes from, but it just appears… like magic. In the screenshot below, the last check contains the live deploy preview.
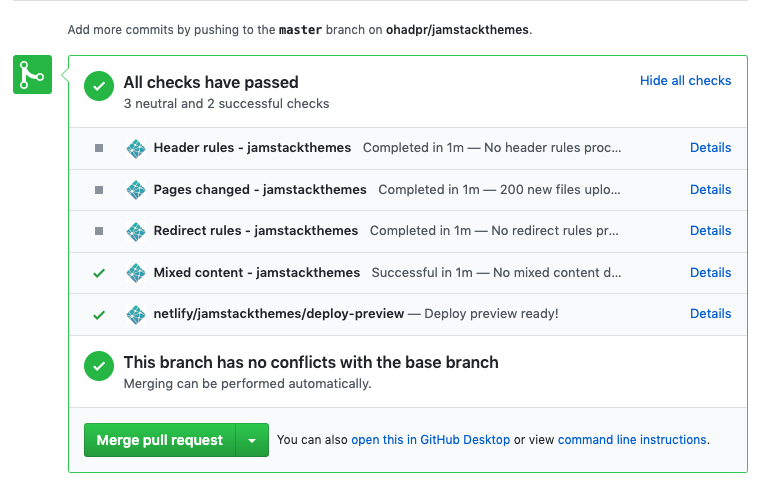
For JAMstack Themes this is really helpful. Since people are submitting a PR and the GitHub data and screenshot is only visible AFTER the build, the deploy preview helps validate everything worked correctly. On top of that if the build fails when fetching the GitHub API data or generating the screenshot you can click through and see the public Netlify build log. Super useful.
Wrapping Up
The first version of this site is by and large similar to what launched. Polishing the site, responsive design, multi-filter (and filter counts) ended up taking a few more days. Often it’s that last 20% that takes just as long as the initial build.
Final Website: https://www.jamstackthemes.dev
Got a theme you’d like to submit? Just make a PR https://github.com/stackbithq/jamstackthemes.e a PR https://github.com/stackbithq/jamstackthemes.


