Guides & Tutorials
Promoting Open Source with Netlify Snippet Injection
We love open source at Netlify — from projects we lead like NetlifyCMS to contributing to others like Jekyll, Hugo, and Docker.
But open source love at Netlify goes the extra mile because of the nature of what we do: With SSL/HTTPS by default, custom domains, continuous delivery and more all covered under our free tier, we are happy to be the host of great open source projects from Lodash to Kubernetes to React!
Open Source and the Ribbon
As the 10 year anniversary of GitHub Pages rolls around, I am feeling a little sentimental about the neat little GitHub ribbons that Tom Preston-Werner also released.

Yes, today anyone can include a little anchor tag with a link pointing back to the source and it does the same thing. But GitHub ribbons were inviting. Just by their very presence they said: You are welcome to view source, join our project, or even fork it. In a simple visual cue they represented the very spirit of open source. People even forked the ribbons themselves, including fun little animations and pure CSS takes!
Can we bring them back?
Snippet Injection
A neat little feature that makes this very easy is Netlify's Snippet Injection. By inserting bits of code at the CDN level, you avoid having to add this to your source code and it can even be done by less technical colleague copying and pasting code from framework-agnostic service provider documentation.
Typically this feature is used for adding analytics providers like Google Analytics or retargeting services like the Facebook Pixel to your site, however a fun way to try it out on your open source site is by adding a GitHub ribbon!
Adding a View Source ribbon to your Site with Netlify Snippet Injection
From your Netlify site dashboard, head to Settings > Build & deploy > Post processing > Snippet injection and hit Add Snippet to start adding.

Netlify gives you the option of two places to add your snippets — at the bottom of your <head> section or at the bottom of <body>, and the latter is the default (hence it says Insert before </body>!). You can name your script whatever you want, and then paste in your script. If any part of your script needs additional data, Netlify inserts it using Liquid template syntax which basically means double curly braces. Netlify automatically provides useful environment variables (like REPOSITORY_URL for git-repo-linked sites) and if you need anything else you can add them yourself. Here's an example script to try on your site:
    <a href="{% raw %}{{ REPOSITORY_URL }}{% endraw %}" class="github-corner" aria-label="View source on Github">
      <svg width="80" height="80" viewBox="0 0 250 250" style="fill:#70B7FD; color:#fff; position: absolute; top: 0; border: 0; left: 0; transform: scale(-1, 1); z-index: 999"
        aria-hidden="true">
        <path d="M0,0 L115,115 L130,115 L142,142 L250,250 L250,0 Z"></path>
        <path d="M128.3,109.0 C113.8,99.7 119.0,89.6 119.0,89.6 C122.0,82.7 120.5,78.6 120.5,78.6 C119.2,72.0 123.4,76.3 123.4,76.3 C127.3,80.9 125.5,87.3 125.5,87.3 C122.9,97.6 130.6,101.9 134.4,103.2"
          fill="currentColor" style="transform-origin: 130px 106px;" class="octo-arm"></path>
        <path d="M115.0,115.0 C114.9,115.1 118.7,116.5 119.8,115.4 L133.7,101.6 C136.9,99.2 139.9,98.4 142.2,98.6 C133.8,88.0 127.5,74.4 143.8,58.0 C148.5,53.4 154.0,51.2 159.7,51.0 C160.3,49.4 163.2,43.6 171.4,40.1 C171.4,40.1 176.1,42.5 178.8,56.2 C183.1,58.6 187.2,61.8 190.9,65.4 C194.5,69.0 197.7,73.2 200.1,77.6 C213.8,80.2 216.3,84.9 216.3,84.9 C212.7,93.1 206.9,96.0 205.4,96.6 C205.1,102.4 203.0,107.8 198.3,112.5 C181.9,128.9 168.3,122.5 157.7,114.1 C157.9,116.9 156.7,120.9 152.7,124.9 L141.0,136.5 C139.8,137.7 141.6,141.9 141.8,141.8 Z"
          fill="currentColor" class="octo-body"></path>
      </svg>
    </a>
    <style>
      .github-corner:hover .octo-arm {
        animation: octocat-wave 560ms ease-in-out
      }

      @keyframes octocat-wave {
        0%,
        100% {
          transform: rotate(0)
        }
        20%,
        60% {
          transform: rotate(-25deg)
        }
        40%,
        80% {
          transform: rotate(10deg)
        }
      }

      @media (max-width:500px) {
        .github-corner:hover .octo-arm {
          animation: none
        }
        .github-corner .octo-arm {
          animation: octocat-wave 560ms ease-in-out
        }
      }
    </style>
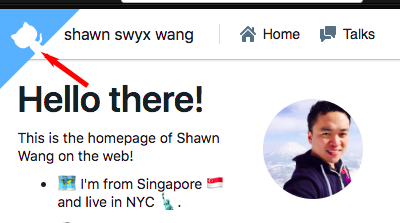
And that's it! Reload your page (note the snippet is injected so there is no build step needed) and voila!
If you want to play around with different kinds of ribbons, here are some fun ones to try out:
- The original GitHub Ribbons
- Tim Holman's Gihub Corners — with neat SVG animation!
- Chris Heilmann's Pure CSS Ribbons — where you can configure custom colors!
- Bitbucket Ribbons
- GitLab Ribbons
In future we will explore writing this as a simple Netlify CLI Addon tutorial so you can turn almost any third party code into a one-line command in your terminal. Subscribe to our blog or Twitter and stay tuned!


